For some time now, I have been frustrated with the limited means by which you can add your own Libraries to AWS Lambda. I was therefore thrilled when I learned that AWS Lambda now supported the use of custom images!
However, this is Covid-Time. I am working from home, I have limited bandwidth, and because where I live is far away from a phone exchange, I rely on 4G for a reliable connection (for real….).
Building an image locally and uploading it to ECR was soul-destroying. So I decided to use the AWS Stack to do the hard work for me, because:
- All activity then takes place within the AWS Network, saving my connection;
- Libraries required by the Docker image downloaded quickly from within the AWS Infrastructure;
- Interacting with other AWS Services was faster.
So how exactly do we achieve this using AWS?
I was surprised by how easy it was to connect all of the relevant services. It was actually faster for me to configure what I needed in AWS than it was for me to build a Docker image on my own PC and upload it to ECR over my connection…
High-Level Architecture
Here are the main components that were needed:
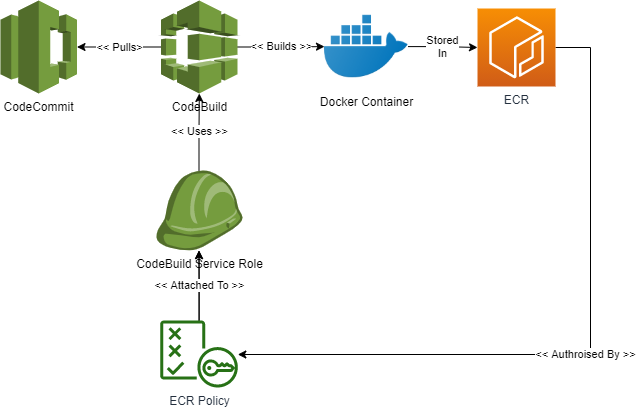
- CodeCommit is used to Store the Git Repo with the buildspec.yml file and Dockerfile, (and other dependent artifacts).
- A CodeBuild “Build Project” is created that reads the repo, uses the buildspec.yml file contained within, and runs the buildspec.yml instructions. Note: The CodeBuild ServiceRole also needs to be updated to provide access to ECR
- Running the CodeBuild pipeline then generates the Docker image, and pushes it to ECR.
The following sections explain the necessary steps in more detail.
1 – CodeCommit Repo
AWS CodeCommit is a Git-compatible repo service. I could, of course, have used my own Git Repo, however, using CodeCommit on AWS at least illustrates the simplicity of the AWS Stack.
Create a CodeCommit Repo, and add the required files (these are supplied below). Within the CodeCommit Repo you will be adding a number of files. The following 2 files are the important ones to understand:
- buildspec.yml – This is a standard instruction file used by CodeBuild. It contains the stages, and the instructions within each stage that CodeBuild needs;
The buildspec.yml file contains the following instruction sets:
pre_build: Gets a login string for ECR, and then uses this string to connect to ECR.
build: Build the Docker image, and tags it for the ECR Repo
post_build: Pushes the Image to ECR.
- Dockerfile – This contains the docker build instructions. In this example, we create a Docker image that contains a Headless Chrome binary, ChromeDriver, Python, Selenium, and a Lambda Definition (a future blog will discuss Lambda Images in more detail).
- Other Files that support the creation of the Dockerfile. In this case: a “requirements.txt” file that is used by Python/Pip to install the necessary Python Libraries in the Docker image, and a “chrome.repo” file that contains instructions on where the Chrome Binary Yum repo is installed.
To make things easier, I created a repo in Github with all of the files you will need. Please go to the following [link] and grab a copy of it to use in your own CodeCommit repo.
2 – CodeBuild
Once you have prepared your CodeCommit repo, the next Step is to build a CodeBuild Build Project that uses the Repo to build your docker image.
When you create your “Build Project”, point it to the CodeCommit Repo you just created, and perform the following additional steps:
- Create an ECR Repo in which to store your generated docker image;
- Update the CodePipeline Build Project role to provide CodeBuild with access to the ECR repo you just created (you can find the name of the Service Role to edit under “<Build Project> – [Edit] – [Environment]. The Role name will be of the form: “codebuild-<build project>-service-role”. The additional IAM Actions you will need to grant access to you need to are:
ecr:BatchCheckLayerAvailability
ecr:CompleteLayerUpload
ecr:GetAuthorizationToken
ecr:InitiateLayerUpload
ecr:PutImage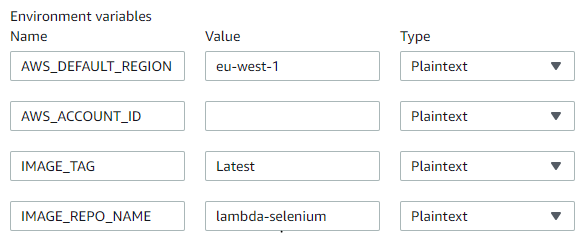
ect:UploadLayerPart- Update the following environment Variables: AWS_DEFAULT_REGION, AWS_ACCOUNT_ID, IMAGE_TAG, and IMAGE_REPO_NAME (the IMAGE_REPO_NAME will be the name of the Repo Created in the previous section) To match your configuration settings (Account Number has been hidden for security reasons):
3 – Run the CodeBuild Pipeline
Once you have completed the above, simply execute the pipeline to generate the Docker Image, and Push it into the ECR repo.
When the CodeBuild pipeline completes, check your ECR repo to confirm the image you have just created has appeared:

Notes
- All code was tested when this article was published and was operating as expected at that point in time. There is a chance that 3rd Party URLs may have changed since the publication of this article;
- Thanks to adieuadieu for creating a Headless Chrome binary that can work with Lambda!
Note: This article is an opinion and does not constitute advice – any actions taken by a reader based on this article are at the discretion of the reader, who is solely responsible for the outcome of those actions.