In unlucky scenarios where an EC2 instance has been breached – either due to poor configuration or by insider intent – it is important to capture the state of the instance for analysis because illegal activity may have taken place on the instance, and evidence may be contained within pointing to the perpetrator and/or the actions they performed.
In most cases this is a straightforward task – by simply changing the security group to an Admin-Only group and generating a snapshot of the image for later analysis. However, this approach deals with storage alone – not volatile memory.
What is volatile memory, and why is it important?
Volatile memory is the memory that stores in-flight operations (e.g. cached objects, Java objects that have not been garbage collected, all register values, etc.). This is important because these objects may contain information relevant to a forensic investigation.
So, what’s the problem?
How do you capture volatile memory in such scenarios? You can’t recreate the image from a snapshot because the memory would then be clean.
The best option is to capture the volatile memory in real-time.
Other approaches to this quandary have suggested AWS Systems Manager simply executes commands directly against the instance. However, this presents challenges from a forensic perspective:
- Where do you store the memory capture prior to its transfer off the instance? You cannot store it on an existing volume, as you may overwrite forensic evidence. So where does it go?
- What tools will you use to capture the memory, and can you rely on those tools being available and operational on the instance (e.g. could they have been compromised too)?
- You must limit where possible the scope of activity you perform on a compromised instance (including the installation of tools, overwriting existing data, etc.). Note: An excellent reference source for forensic techniques in the cloud (from NIST) is included at the bottom of this document;
- When commands need to be updated, you must update the SSM documents in every account, making maintenance difficult.
As an alternative, I suggest a modern-take on the trusted approach of using forensics tools on removable media; namely, “creating and using a forensics volume”.
What is a forensics volume?
It is an EBS volume that contains all of the tools you need to perform forensic analysis and enough storage space to store the output (and any temporary space that may be required prior to compression of the said output). Tools on the volume should not require an installation and should execute straight from the volume (no RPMs please!). The reason for this is that the installation of Forensic software on a volume can corrupt the very memory (and storage) you need to preserve.
Typical contents of a forensics volume are:
- Forensics binaries;
- Bash scripts that simplify the process by calling the binaries, and performing any other remedial tasks;
- Forensic activity output.
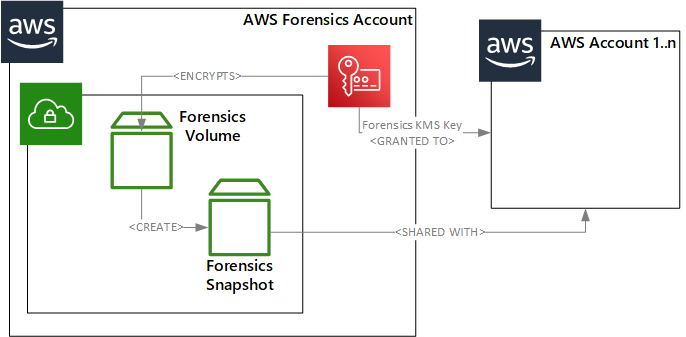
In the following diagram, a forensics volume (which may also be attached to a forensics EC2 instance for update and testing) lives in an AWS account specifically used for providing forensics services:

At regular intervals a snapshot is taken of the Forensics volume and both the KMS Key used to encrypt the volume and the volume itself is shared with any AWS Account(s) that require forensics capability.
Since this snapshot is shared it simplifies the update of your forensics toolkit – you simply update your tools, create a new snapshot and share the new snapshot ID with the other AWS Accounts. This is less complex and difficult to manage than an approach where all logic is embedded into the SSM Documents themselves.
Capturing Volatile Memory

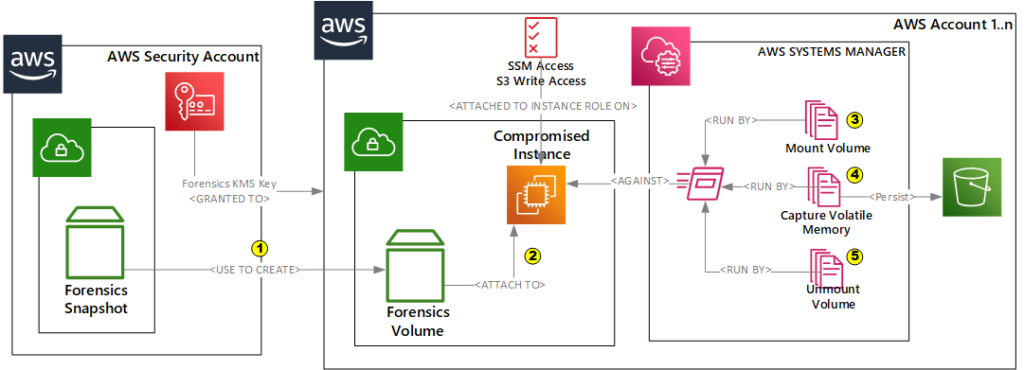
To capture forensics memory, we simply:
- Use the shared snapshot from the security account to create a new volume in the account of the compromised instance;
- Attach the new volume to the compromised instance;
- Use systems manager to run a document to mount the volume that has just been attached to the instance
- Use systems manager to run a document to execute the forensic script (e.g. you might have a script called capture.sh that performs all the necessary tasks, so all Systems Manager needs to do is to call that script), and
- Use systems manager to run a document to un-mount the volume afterwards..
And that’s it!
Of course, you will want to automate the steps above using a tool such as CloudFormation, Terraform, etc.
Gotchas and Notes
- You may wonder why I have suggested the use of 3 different scripts (e.g. mount, capture, and un-mount) instead of a single script. The reason for this is to produce two additional generic assets (mount and un-mount documents) that can be used across other processes and to simplify testing by breaking the capture process into chunks.
- When deploying instances into your AWS account(s) ensure the SSM agent is installed and that they have a security policy that (a) allows SSM to manage the instance, and (b) allows the instance to write to S3;
- You should consider creating an automated forensics “bootstrap” script that creates the necessary assets (e.g. SSM documents, etc.) in all AWS accounts that have forensic relevance for you;
- For the script that mounts the volume be aware of the different volume naming conventions which are O/S dependant (e.g. dev/sd[x], dev/xvd[x], dev/nvme[x]n1). For my forensics scripts I test the existence of each of the potential block device names prior to mounting them. Note: I also identified a use-case where AWS did not alias the Nitro block device name (e.g. dev/nvme[x]n1) with the standard dev/sd[x] naming convention. This required a complex workaround using the volume serial number to be able to identify the correct device to mount. Please contact me directly if you want more information on this.
Note: This article is an opinion and does not constitute advice – any actions taken by a reader based on this article are at the discretion of the reader, who is solely responsible for the outcome of those actions.


